
How to Create a Digital Wardrobe Inventory
A step-by-step guide to creating a digital wardrobe.

This is an in-depth guide, so you’ll need to view it in a browser to get the full experience.
I’ve kept a digital wardrobe for years. Out of everything I’ve tried—capsules, no-buys, seasonal edits—it’s been the most useful tool by far.
It tracks what I buy and exactly what it costs. It shows me how often I wear something. It tells me what’s earning its place and what’s being ignored. And it’s helped me shop more secondhand and buy far less new.
More than that, it’s been the single biggest driver of my personal style. When you can see how long you’ve owned something and how often it actually leaves the hanger, you stop guessing about what works. You start seeing it.
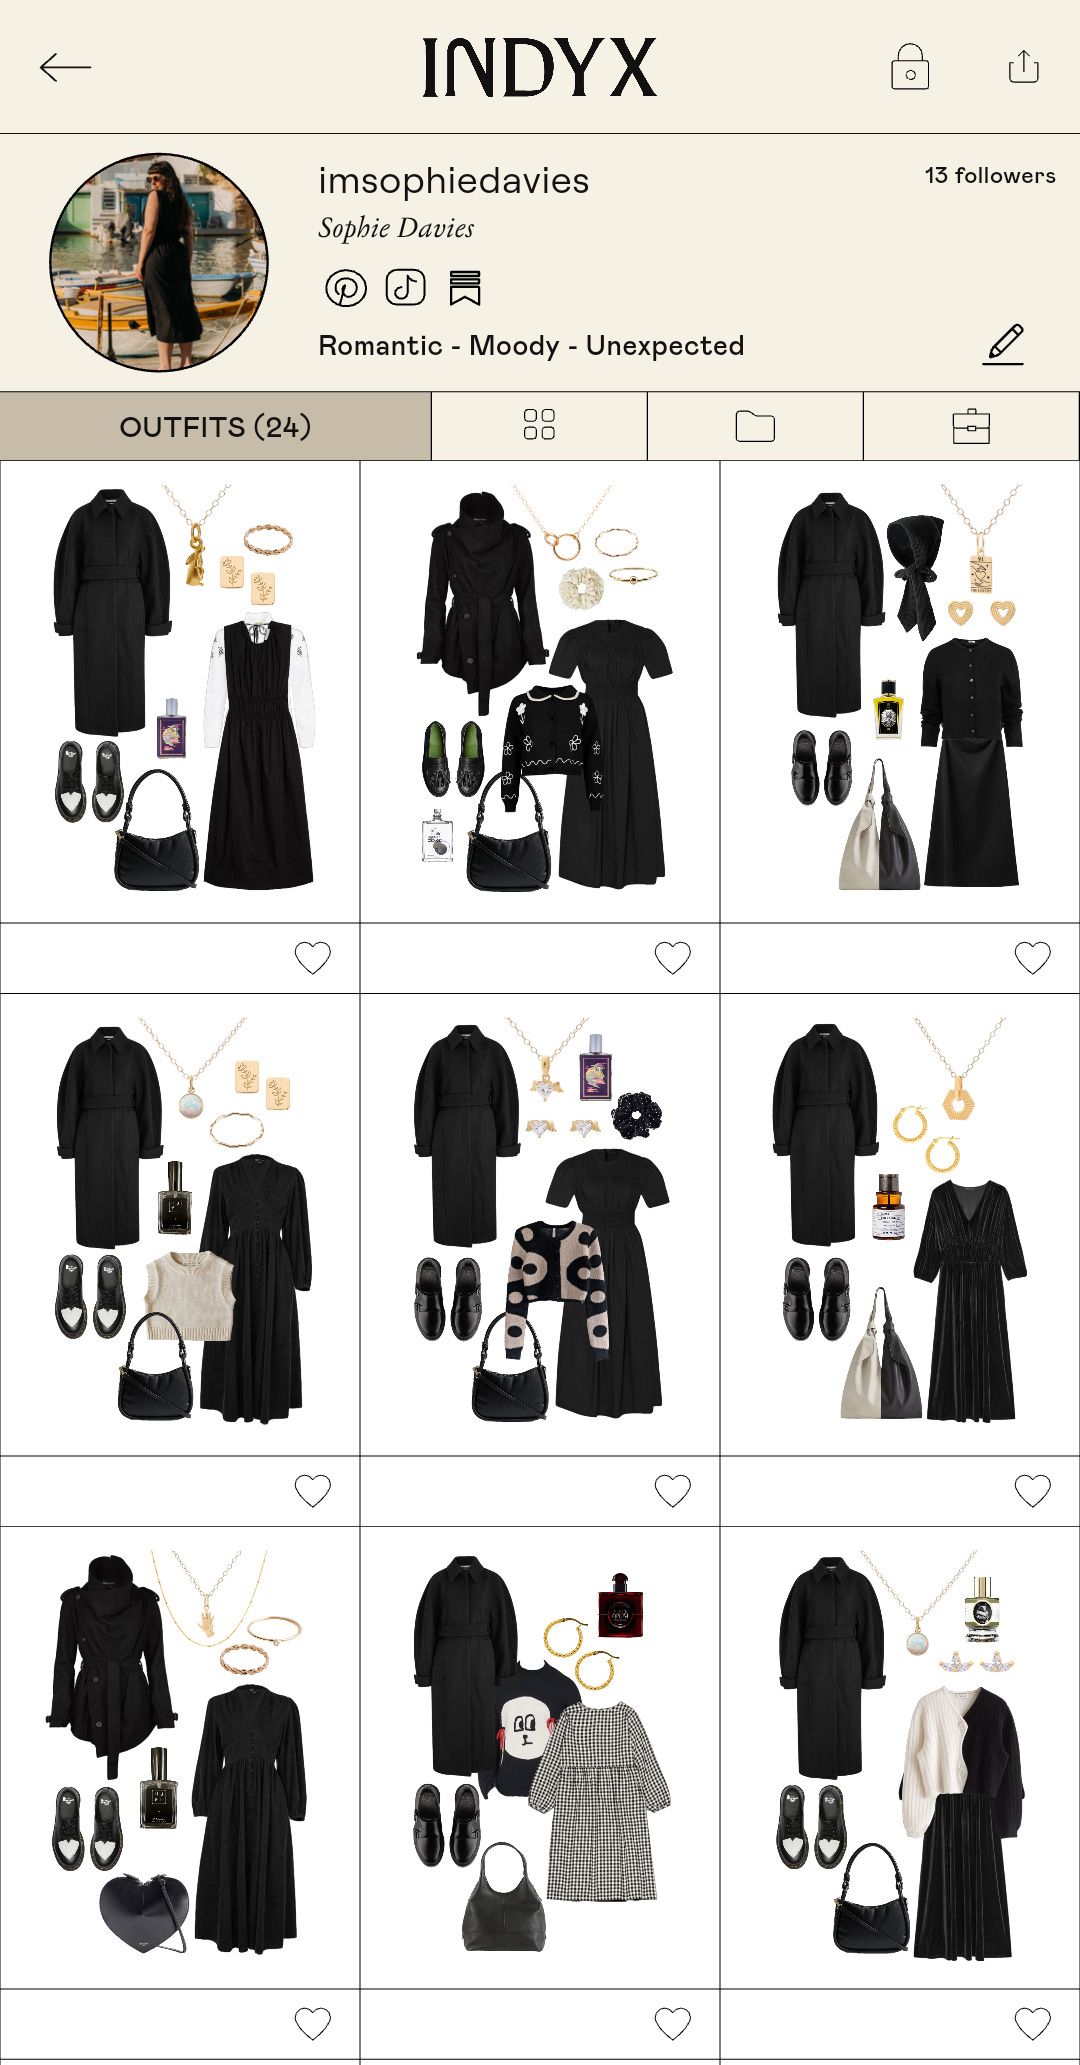
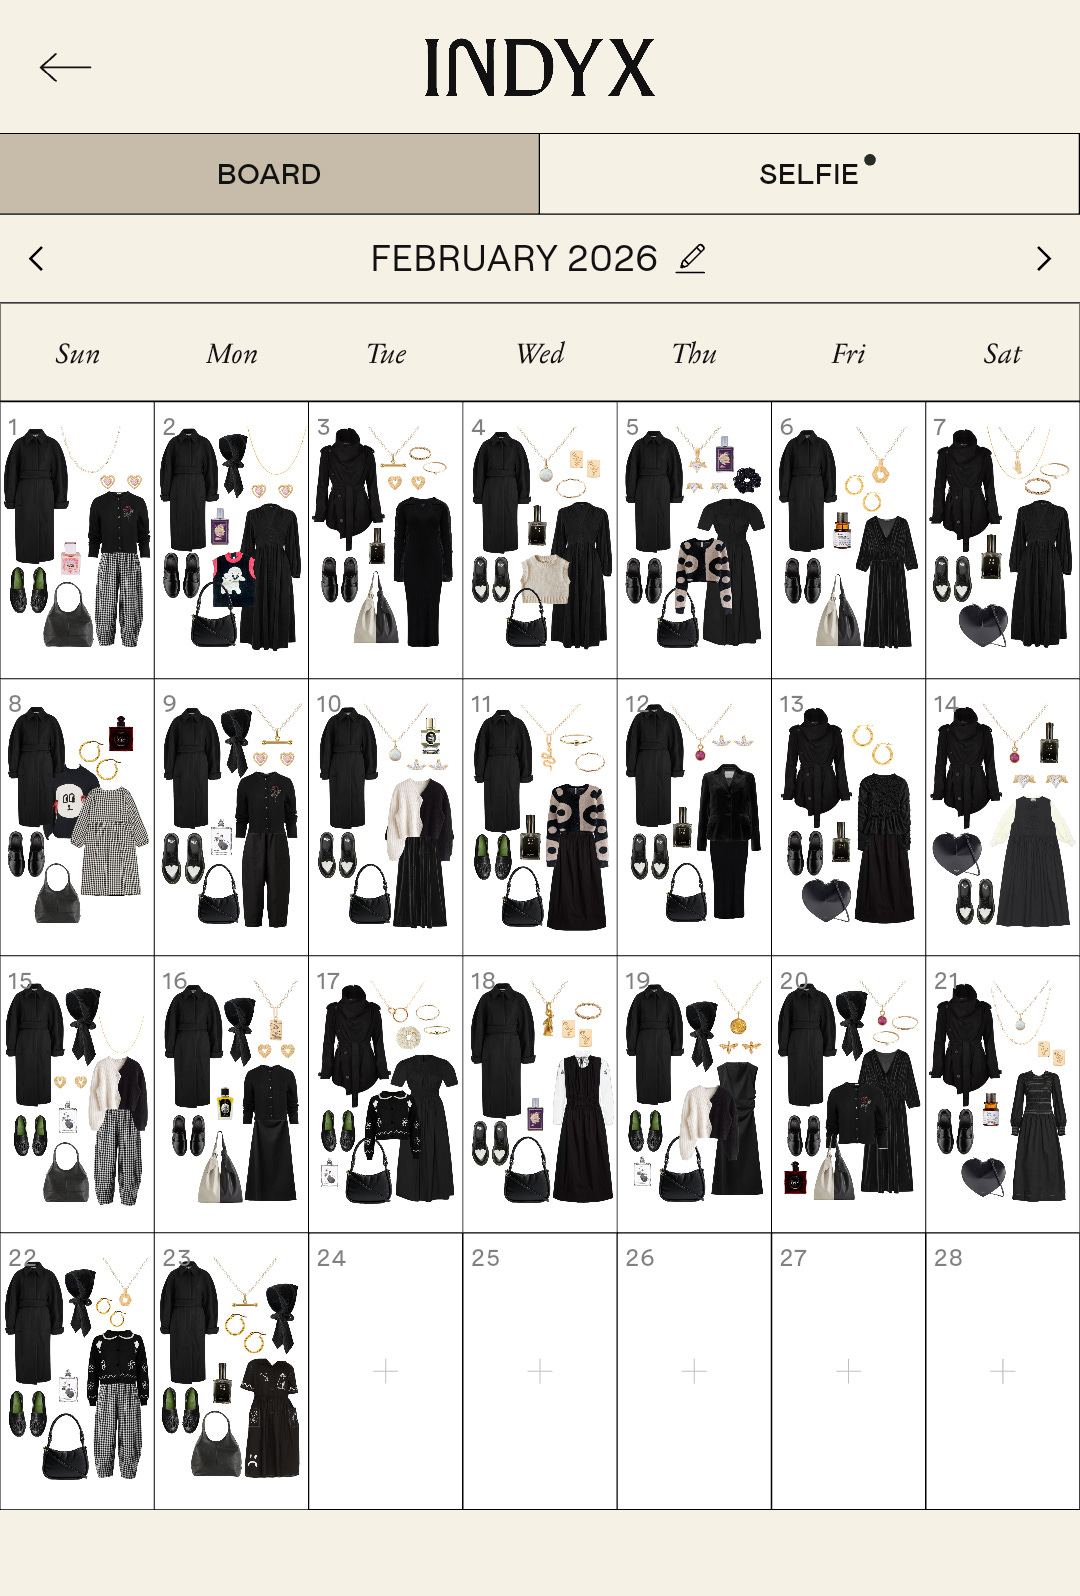
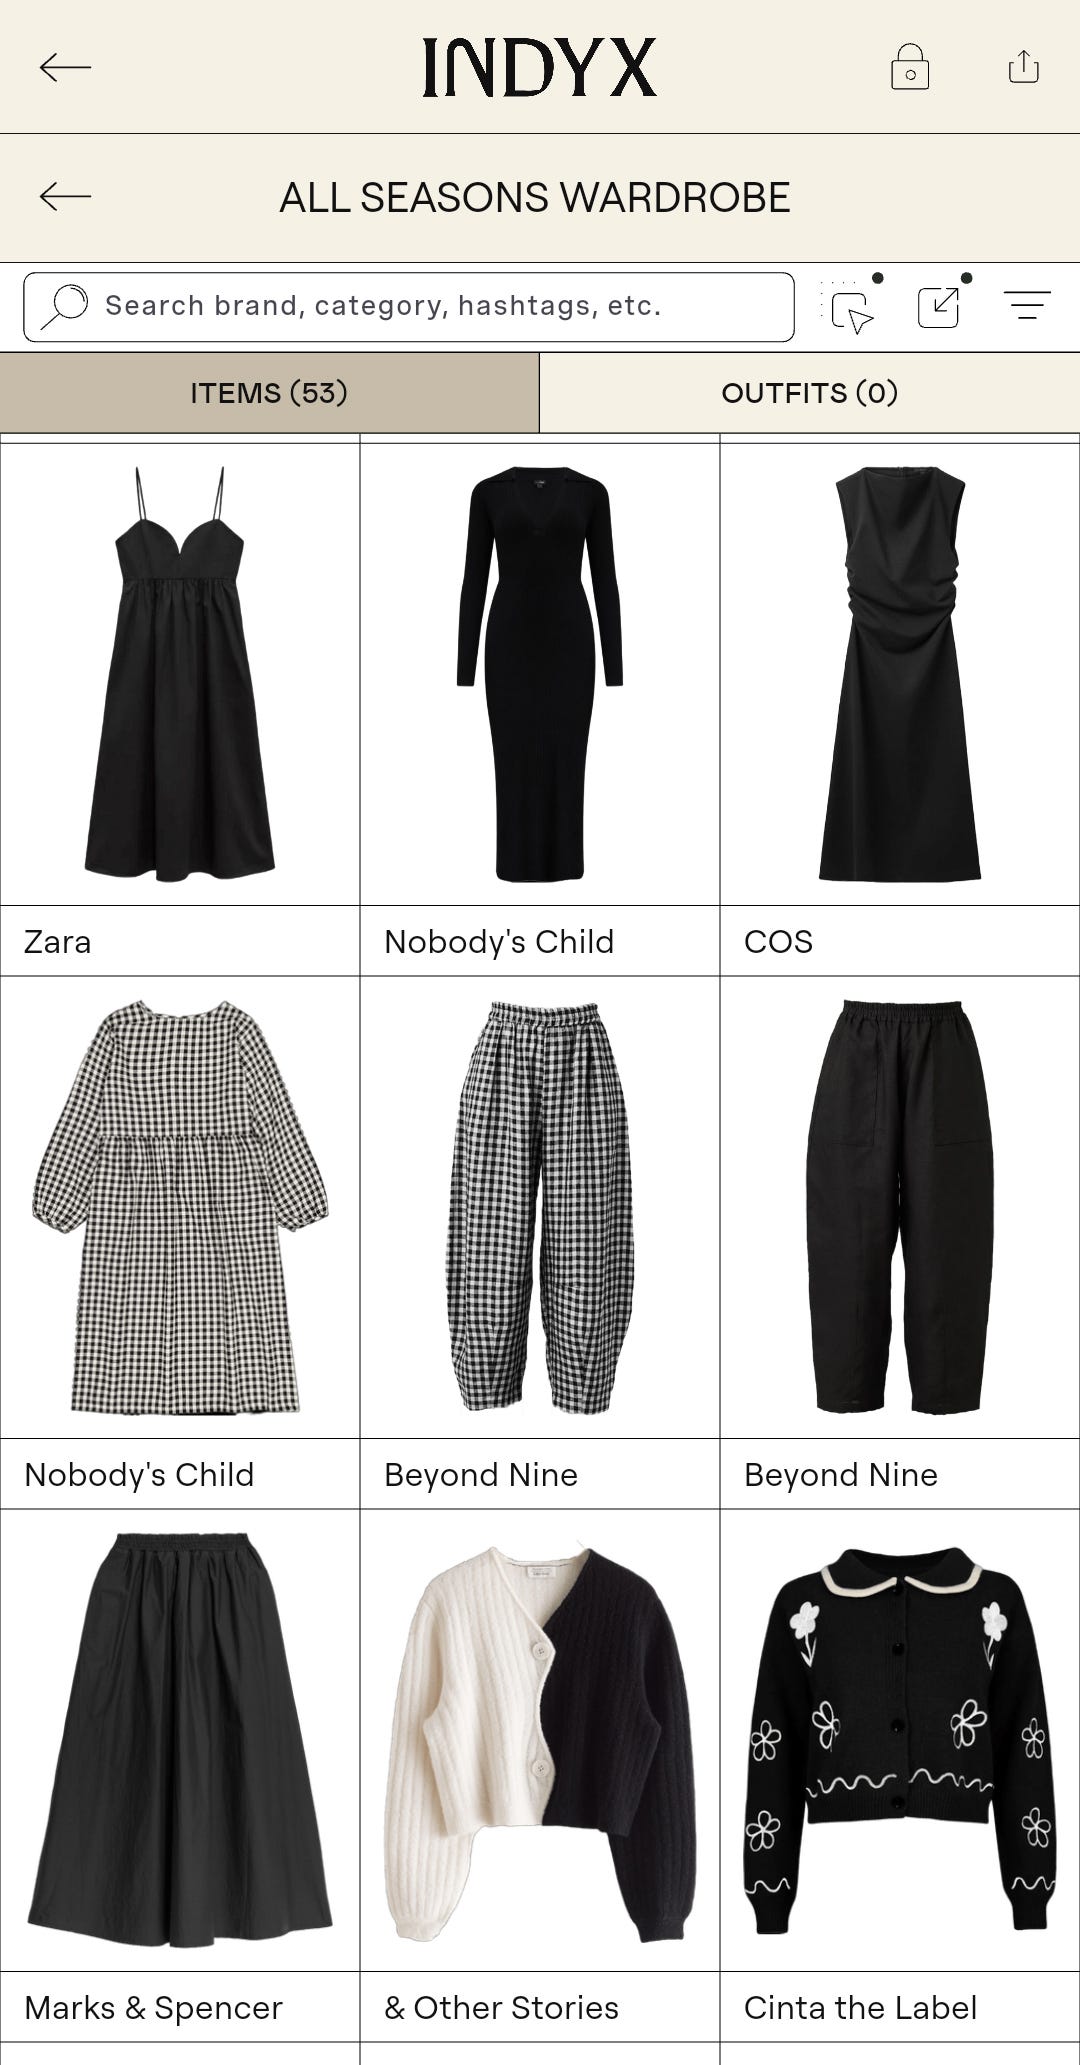
I’ve moved my entire system into INDYX. I’ve tested everything from Stylebook to Whering (reviews here), but INDYX won because it feels like a professional tool. The calendar view is the real clincher though; seeing a full month of outfits side by side shows you what your style actually looks like from the outside.
And sometimes, that’s not what you thought it was!
Digitising your wardrobe closes the gap between the ‘fantasy’ style you think you have and the reality of what you actually wear. That kind of clarity is powerful.
People hesitate because it feels like a daunting task. But it doesn’t need to be. I’ve done this three or four times now so I’ve already made the mistakes so you don’t have to.
In this guide, I’ll walk you through the fastest, least painful way to do it.
What Is a Digital Wardrobe?
A digital wardrobe is a visual inventory of everything you own. Not a vague, half-remembered mental list of things you remember, but the actual clothes you own.
Most of us only really “see” the 25% we wear on repeat. If we haven’t worn something recently, we don’t fully register it as part of our wardrobe. And if we forget it’s there, it may as well not exist. That’s how you end up standing in front of a full wardrobe, convinced you have nothing to wear.
A digital wardrobe ends the guesswork. Once you can see it all clearly, you can start making better decisions

Why Bother?
This level of fashion navel-gazing isn’t for everyone and if it’s not solving a problem you actually have, it’s probably not worth the effort. But if you’re already overthinking what you wear, you might as well have the data to back it up:
See all your clothes in one place—no digging through rails or drawers.
Put outfits together on your phone instead of trying everything on.
Plan travel outfits without emptying your wardrobe onto the bed.
See what you actually wear, not what you think you wear.
Spot the items you never reach for.
Declutter with confidence.
See what’s genuinely missing before you buy anything.
Check your wardrobe while shopping to avoid buying the same thing twice.
Plan outfits in advance so getting dressed is quicker.
See if one season is overloaded while another is lacking.
Track how often you rewear items.
Work out which specific clothes and brands are worth the money.
Defining Your Priorities
Before you start, decide why you’re doing this. Your answer determines how detailed you need to be and whether you’ll actually finish the job.
What’s the Goal?
Ask yourself what actually matters to you:
The Data: You’re here for the numbers. You want to know exactly what you spent, when you bought it, and your cost-per-wear down to the penny.
The Visuals: You’re here for the aesthetics. You want to plan outfits, build packing lists, and see your wardrobe as a cohesive collection rather than a messy pile of clothes.
The Habits: You’re here for the big picture. You want to track what you wear and see the analytics, but you don’t need the nitty-gritty details of every single transaction.
Personally, I fall into the Habits camp. I want my clothes logged so I can plan and track my outfits, and I’m curious about my wear frequency but I don’t need an app to tell me which colour I wear most often.
By keeping the input focused, the whole process stays more manageable.
Decide What To Track
You don’t need to upload everything. If you want to keep it simple, stick to the traditional capsule categories and your daily clothes: outerwear, knitwear, tops, bottoms, dresses, and shoes. Everything else can be ignored. You can always add more later.
When I used a spreadsheet, I stuck to those strict boundaries. With INDYX, I include almost everything because my goal is total visibility and outfit planning. But that meant it took more time. The choice is yours.
How To Create a Digital Wardrobe
If you want a TL;DR version, here it is: find stock images of your clothes online, throw them into INDYX with the brand name, and start tracking. It can literally be that simple.
However, if you want a digital wardrobe that is more useful to have and—dare I say—fun to use, you need to be realistic about how long it’s going to take. Even with my spreadsheet, it still took me over an hour to log just my basics. Once I added the “fun stuff” like jewellery and accessories, I was closer to the two-hour mark.
If I were starting from scratch tomorrow, here is exactly how I would create a digital wardrobe.
Step One: Pick One System
The best system is the one you’ll actually bother to use. There’s no point setting up an in-depth digital archive if you’re going to abandon it the moment life gets busy. So pick the most appealing option.
The Spreadsheet Route
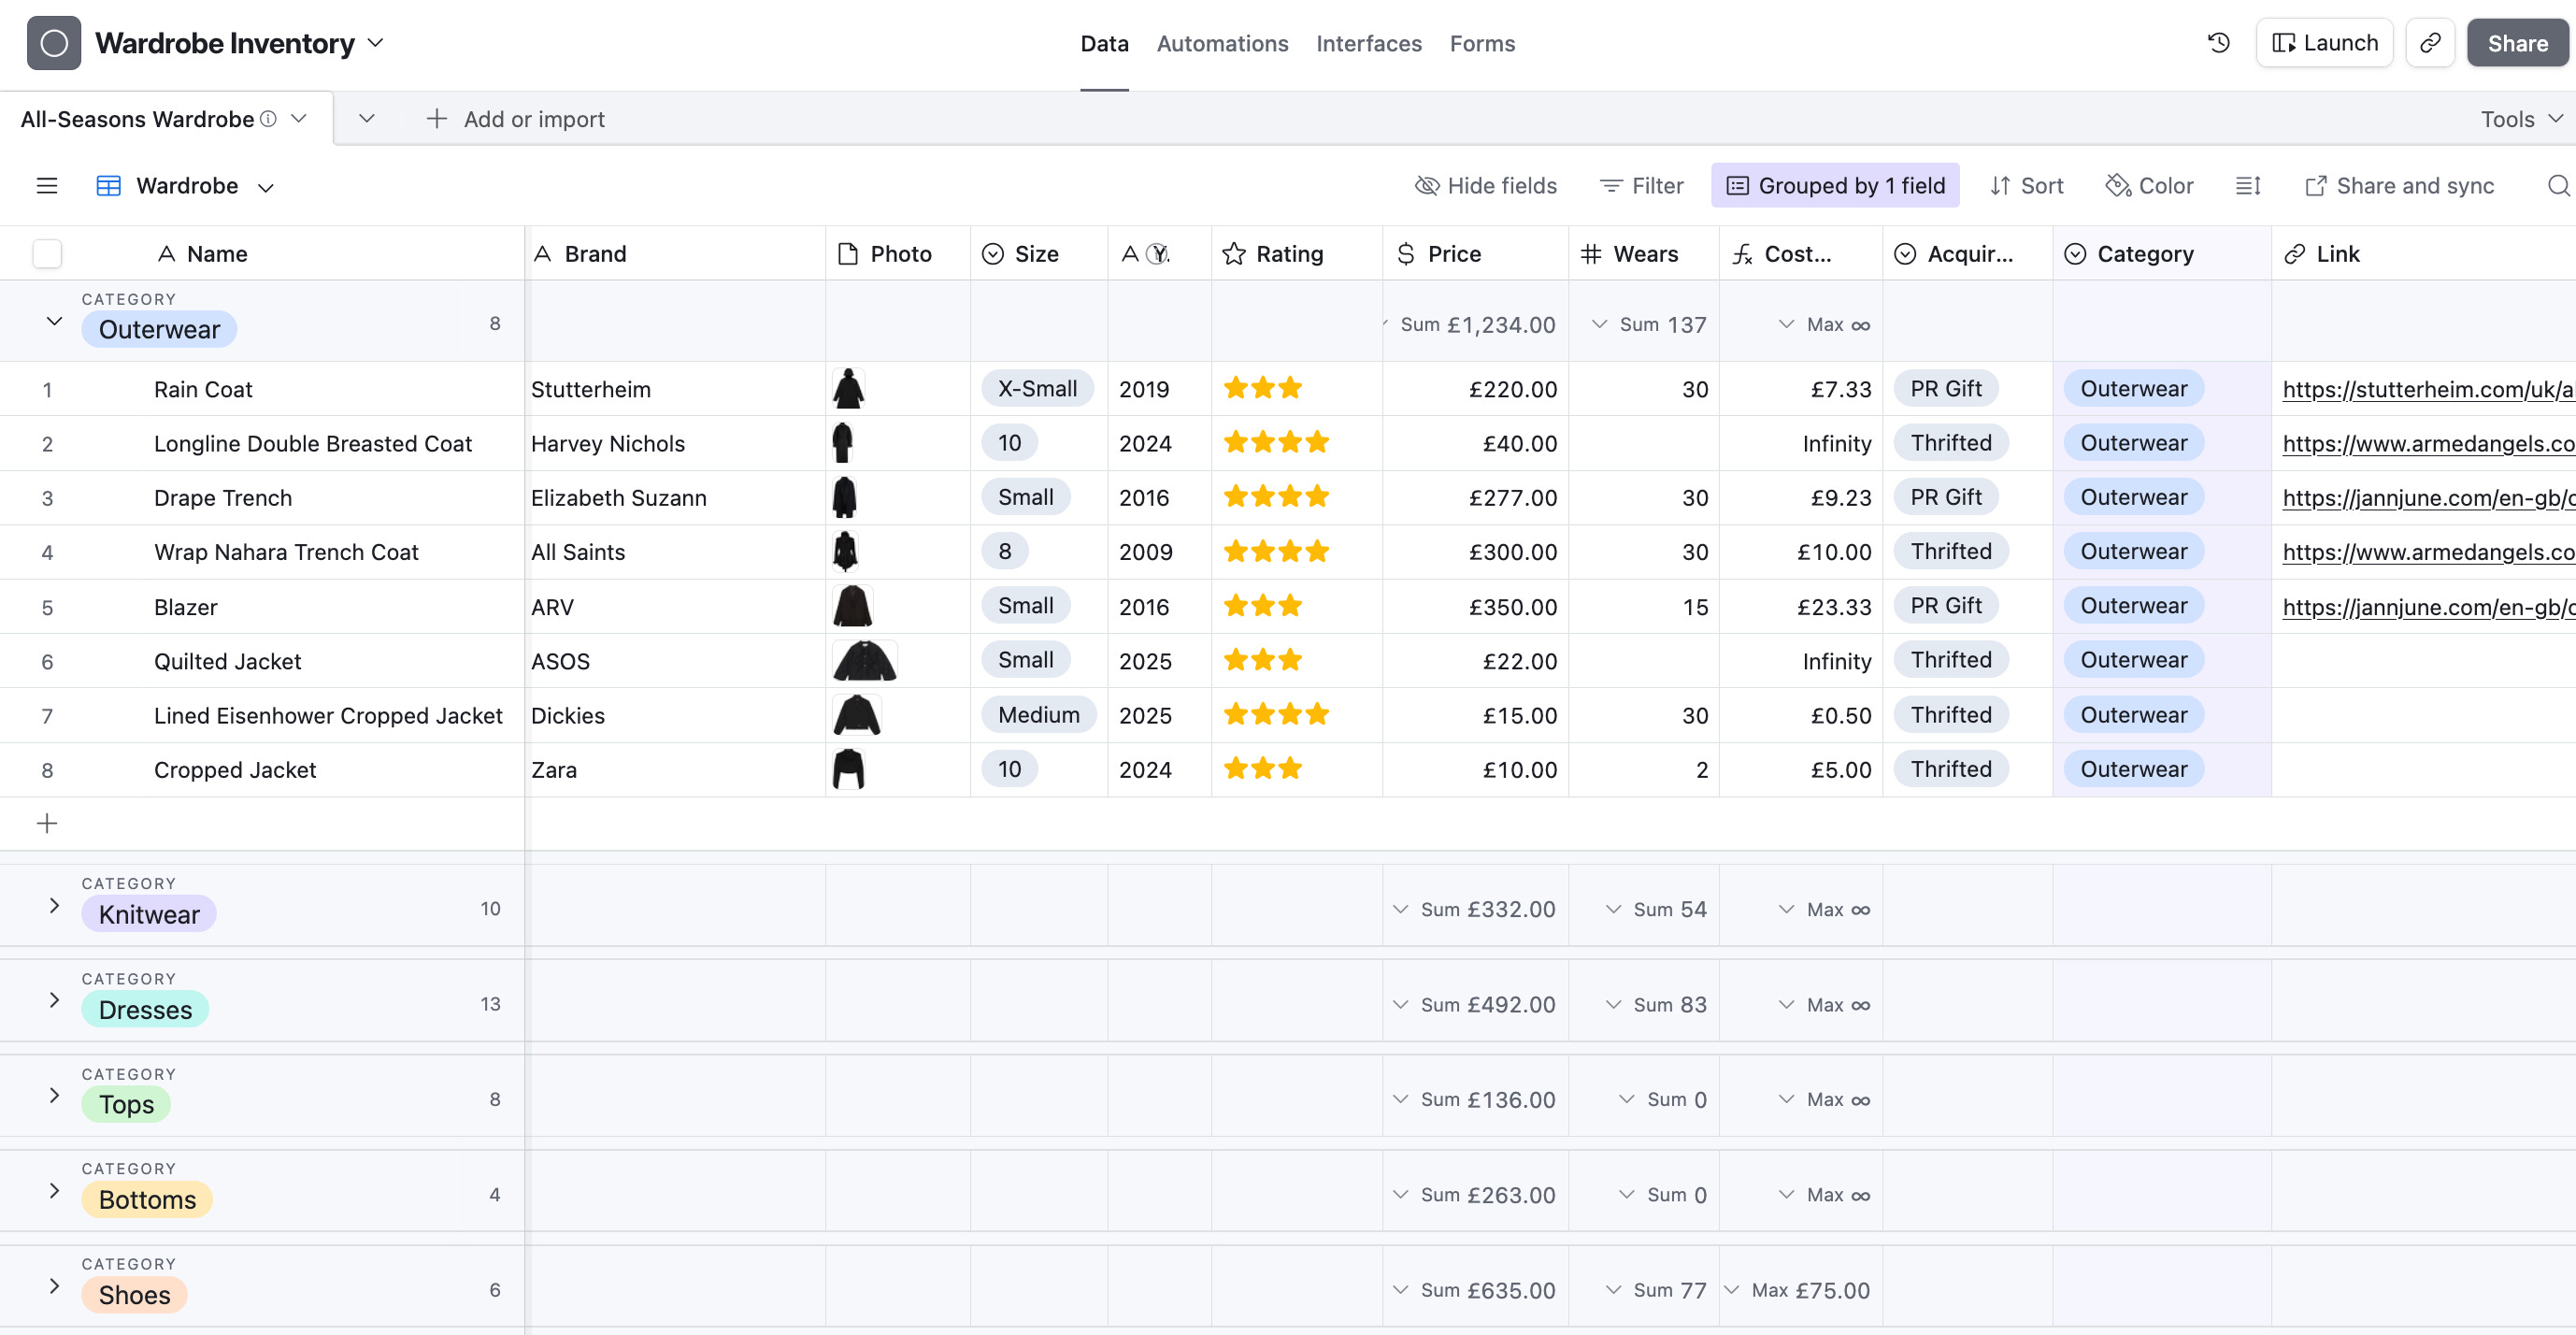
If you want a simple, drag-and-drop system, a spreadsheet is an excellent choice for creating a data-driven inventory of everything you own.
I tracked my wardrobe this way for years before moving everything into INDYX. Because the data already existed, the transition was straightforward. Once the foundation is built, maintenance is minimal.

In my 5-Day Considered Style Reset course, I provide a link to the exact wardrobe inventory template I used. It’s perfect if:
You want a straightforward inventory of what you own.
You prefer keeping your data private, off third-party platforms.
You like a clear, bird’s-eye view of numbers without “social” features.
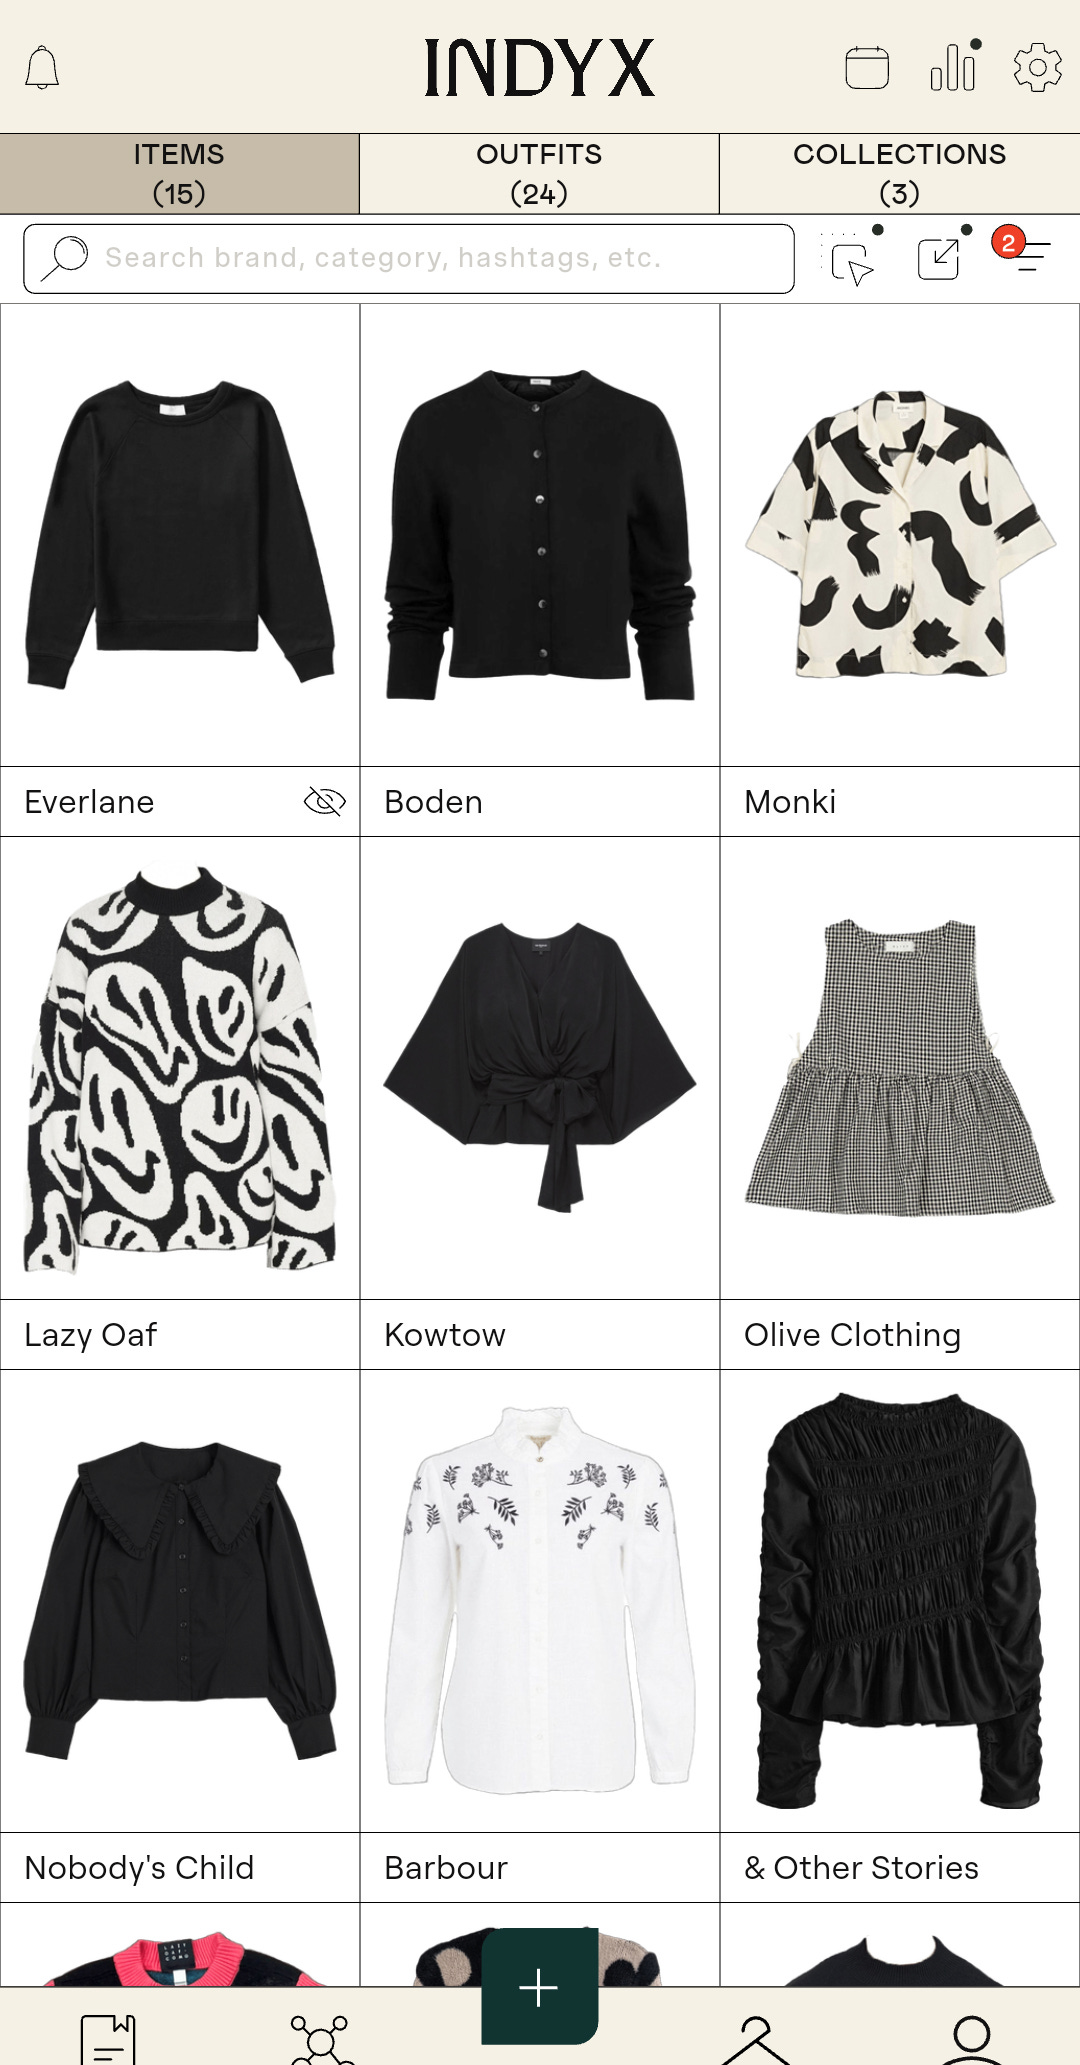
The App Route
If you want to do more than just list your clothes—outfit tracking, wear frequency, calendar views, and visual styling—then an app like INDYX is the way to go. Other wardrobe apps are available, I’ve reviewed them here.
The Golden Rule: Keep Backups!
Whichever system you choose, backup your original images. Save screenshots, stock photos, and your own pictures in a dedicated folder on your laptop or cloud storage.
Apps can shut down. Subscriptions will change. Better tools will inevitably come along. This is where keeping a spreadsheet as a secondary record—a permanent home for your data and images—becomes invaluable.
If your image library is intact, switching systems is a minor admin task. If it isn’t, you’re back at square one, trawling the internet for a stock photo of a specific GANNI dress wondering whether you bought it in 2002 or 2022. Don’t do that to yourself.
Step Two: Start Small
Whatever you do, do not attempt to photograph your entire wardrobe in one afternoon. That is the fastest route to burning out and giving up.
Start with your daily drivers. Ignore the rare wears. Focus on the clothes that reflect your current life, not the version of you that attends three gala dinners a year.
The Category Method
If you want to blitz through the work in a few focused sessions, work methodically. Break your wardrobe down into the basics: tops, bottoms, dresses, knitwear, outerwear, shoes, and bags.
I recommend starting with a small, easy win (bags are ideal), then moving to a larger category (tops), followed by something moderate (outerwear). Complete the entire process for one category—images sourced, details logged—before moving to the next. You’ll feel a much greater sense of accomplishment ticking off an entire section than you would having several half-finished categories.
If a full inventory feels too daunting, try these starting points instead:
The Current Season: Only log the items you’ll actually be wearing for the next three months.
The Daily Drivers: Focus on your most recent purchases and everyday favourites.
The “Unsure” Pile: Log your least-worn items so you can experiment with styling them digitally before deciding whether to declutter them.
The “Slow-Burn” Approach
If batching still feels overwhelming, use the “as-you-wear-it” method:
Weekly batch: Upload the items you wore that week: work staples, favourite basics, reliable layers.
Daily log: Add items individually as and when you wear them.
After a few weeks, your daily essentials are logged. After a few months, your personal style trends emerge. After a year, most of your wardrobe is documented with minimal effort.
This also doubles as a decluttering filter. If something hasn’t made it into your digital wardrobe after twelve months, does it really deserve a place in your physical wardrobe?

Step Three: Source Your Images
Stock photos are the ultimate time-saving hack for digitising your wardrobe.
In my opinion, taking your own photos is a waste of time. It’s a massive drain on your energy, the lighting is never quite right, and the results usually look a bit messy. Stock photos are the secret to an aesthetically-pleasing digital wardrobe.
How to Find Stock Photos
Even if your clothes are second-hand or years old, you can usually find the original listing image with a bit of detective work:
Google Image Search: Take a quick, rough snap of your item and run it through a reverse image search. Nine times out of ten, it will pull up the original retail photo or a marketplace listing of the exact same item.
Resale Listings: Search for the item on reselling apps like Vinted, Depop, or eBay. Pro sellers often do the hard work for you by tracking down the original stock images for their listings—you can just “borrow” them from there.
New Purchases: The easiest way to source images is at the point of purchase. The second you buy something online, screenshot the listing immediately. It takes five seconds and stops you from having to hunt for it months later when the retailer has taken the page down.
Close Enough Items: If you can’t find the exact item, find a “close enough” match. If you have a cardigan from a brand that no longer exists, just find a high-quality stock photo of one that looks identical. Once it’s in a flat lay, no one (including you) will know the difference.
When You Have to Take the Photo
Occasionally, you’ll have a unique vintage find or a handmade piece with no digital footprint. If you must take your own photo, follow these rules to keep the results looking professional:
High-Contrast Backgrounds: Use a plain, contrasting background to help the AI. Lay dark items on a white sheet and light items on something dark. This makes it infinitely easier for background-removal tools to detect the edges accurately.
Natural, Even Light: Find a bright room, but avoid direct sunbeams or standing right next to a window. You want soft, even light to prevent harsh shadows and distorted colours.
No Filters: You want the digital version to match reality. If the colour looks a bit washed out, do a basic edit to bring it back to life, but avoid over-processing it.
Background Removal
If you’re using INDYX, the app handles the background removal for you during the upload. If you’re sticking to a spreadsheet, you can use the built-in “long-press” feature on an iPhone camera roll to lift the subject, or run the images through a background removal tool like this and this.
Don’t Task-Switch
When you’re working on a category, source all your images first, then move on to the uploading and data entry.
Gathering twenty stock images in one go is significantly more efficient than stopping and starting every three minutes. By separating the “search” phase from the “upload” phase, you’ll get into a flow state and finish the whole category much faster.
Use Placeholders to Keep Momentum
If you’re struggling to find an image for a specific item , don’t waste time hunting for the exact match. It will kill your momentum if you spend an hour chasing one item.
Use a placeholder instead—even if it’s just a colour swatch. You can take a proper photo the next time you actually wear the garment, but for now, just keep the setup phase moving. Done is better than perfect (for now!)
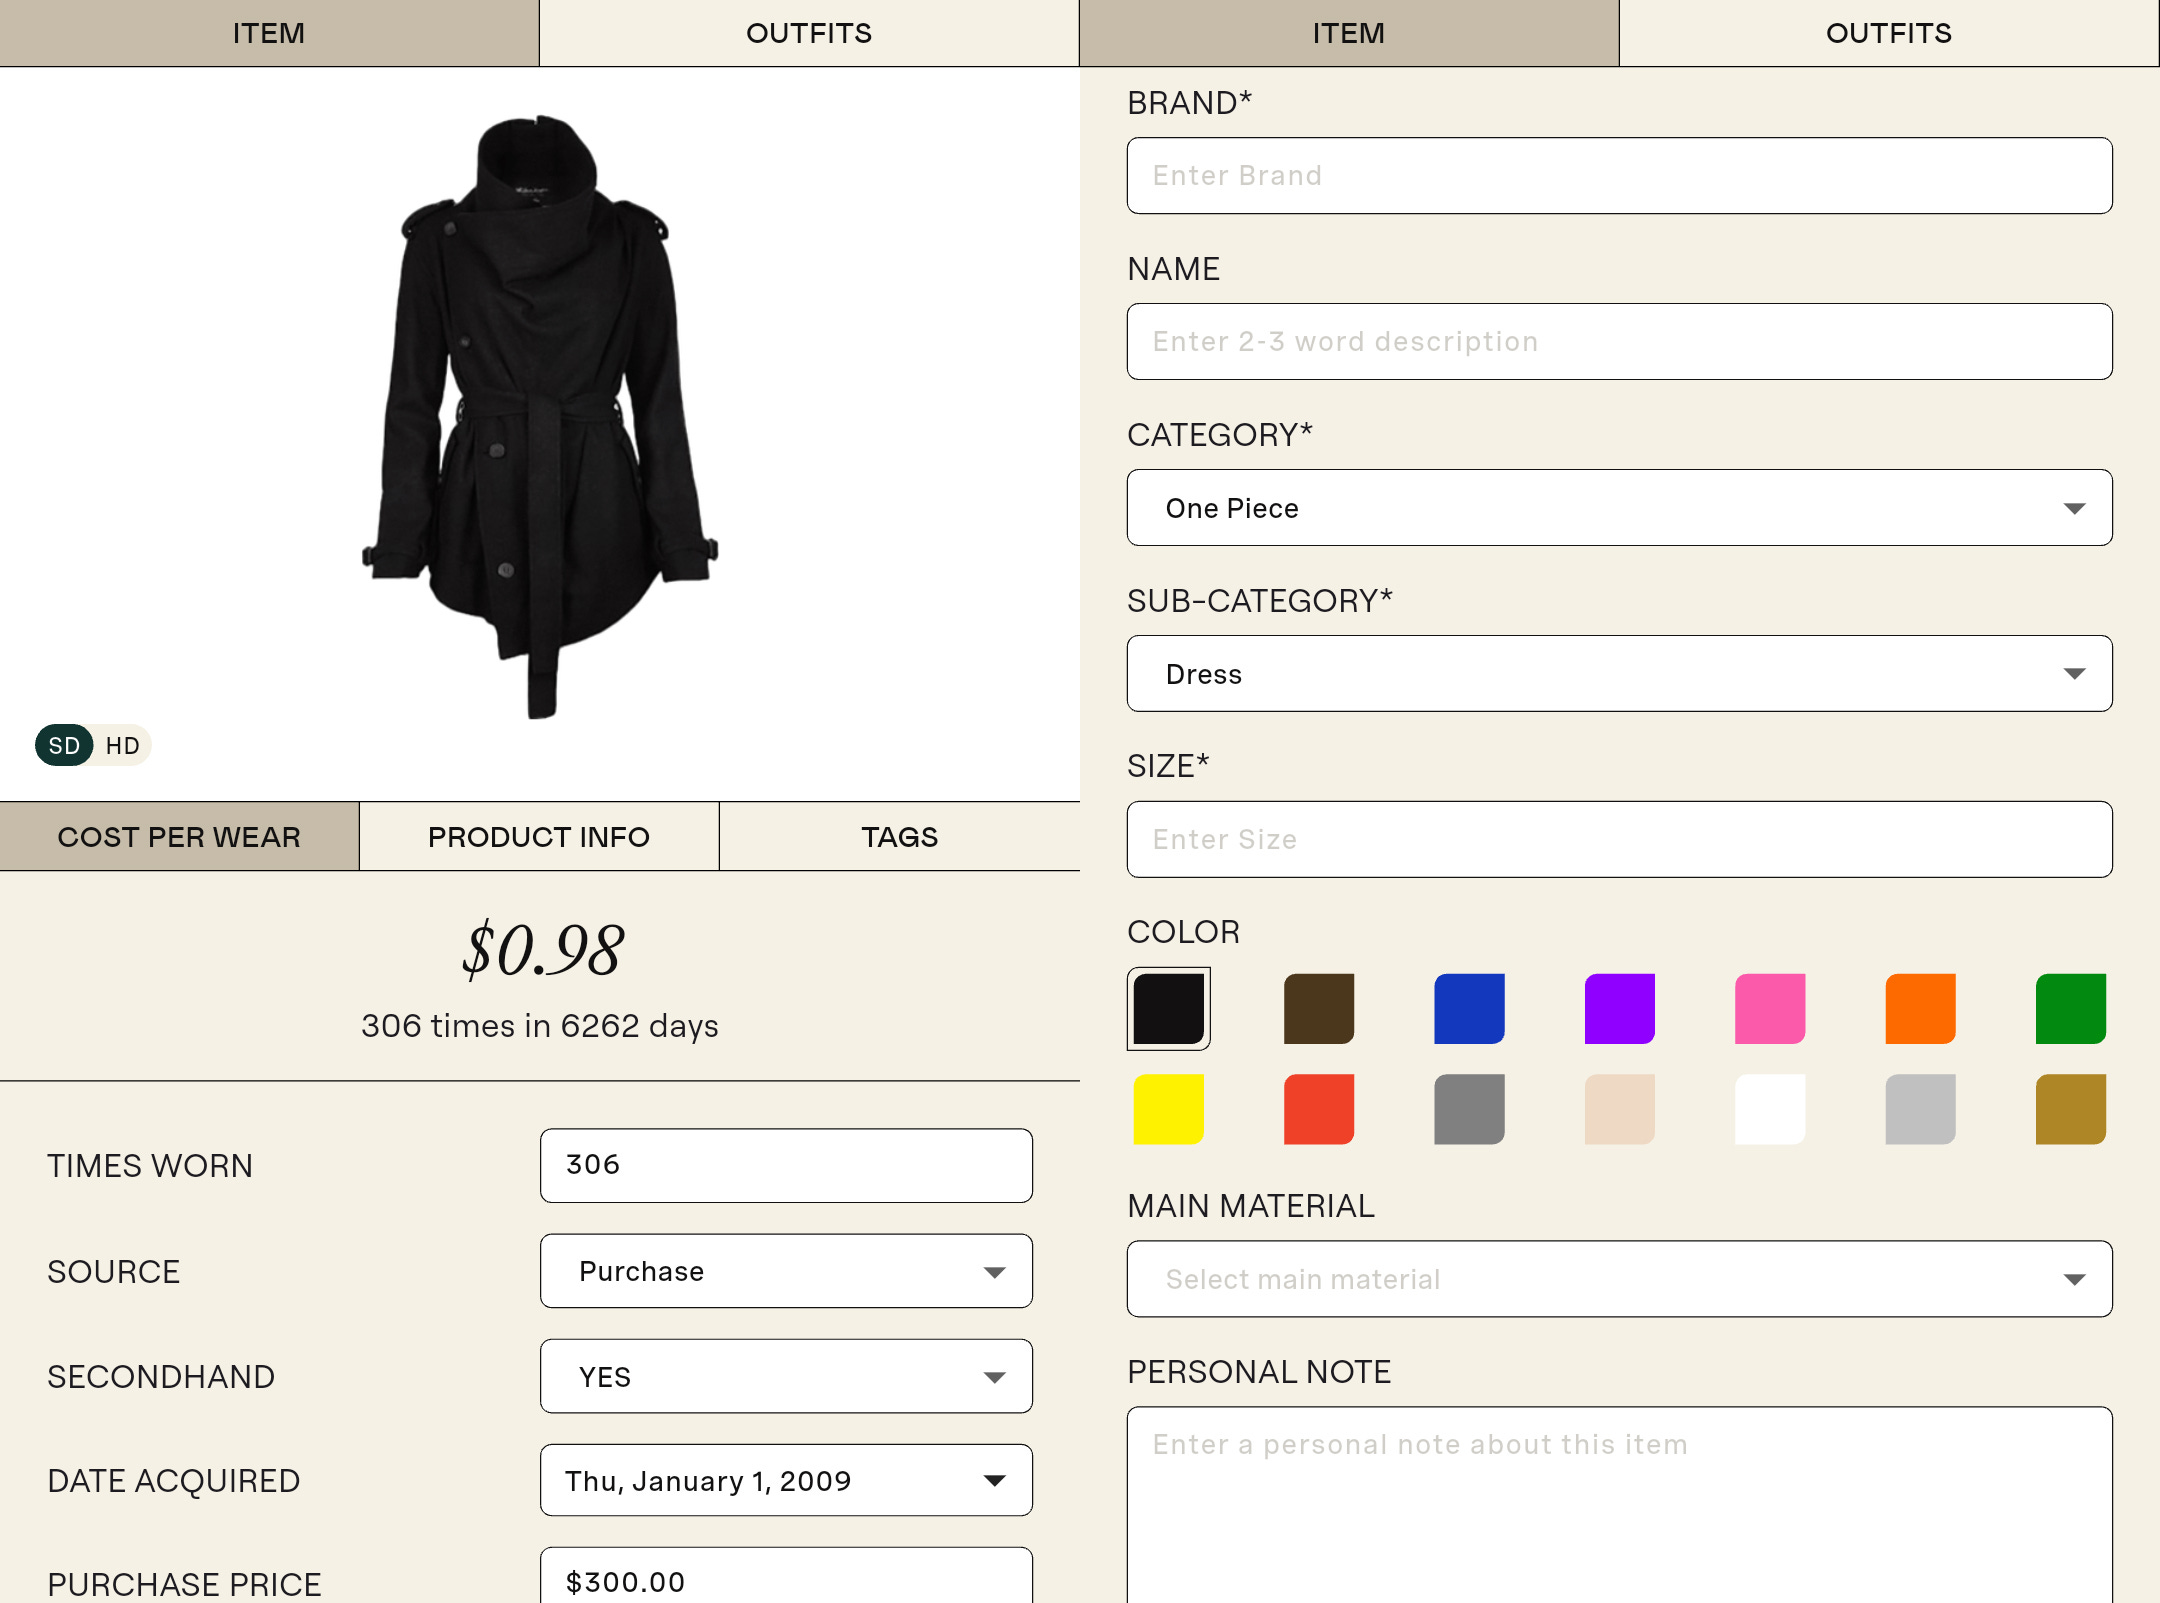
Step Four: Add the Data (Or Don’t)
You don’t actually have to include any information about your clothes at all. If you want to cut your digitisation time in half, skip the data entry and just upload the images.
The downside, of course, is that you’ll miss out on all those juicy analytics. If you don’t tell the app what you paid or when you bought something, it can’t calculate your cost-per-wear or prove that 70% of your wardrobe is coats. Plus, the longer you leave it, the more likely those details will slip your mind. If you don’t log the price of that skirt now, you probably never will.
If that data matters to you, do it as you upload—just be prepared for the process to take significantly longer.
Don’t Let Old Unknown Data Block You
If you’re digitising an older wardrobe, you’ll inevitably forget what you paid for certain items or when you bought them. Don’t let a missing price tag from five years ago stall your progress. Either estimate the details or leave them blank. The goal is to build a functional tool for the future, not a perfect historical record of the past.
I’ve tracked my purchases for a decade, but even I only have the general year, not the exact date. I also don’t have historical wear data for my older items, so I simply make an educated guess for the wear count and move on. You can always refine the data later if you find an old receipt, but for now, keep moving.
The Basic Data Set
If you want some data logging without turning this into a full-time job, keep your input as lean as possible. For each item, I’d suggest recording:
Brand: Helps spot which labels you actually wear long-term.
Category: (e.g. Jumper, Trousers) – Essential for filtering.
Date Bought: Useful for tracking longevity.
Cost: Great for working out cost-per-wear.
Colour: Helps refine those visual “style words.”
You could go deeper—adding material, size, condition, or even the original shopping URL—but none of that is essential for a functioning digital wardrobe. You can also use tags to filter your view, which is particularly handy for hiding heavy wool coats in the middle of July.
My advice? Focus on the momentum. Get an entire category uploaded first so you can actually see the progress. You can always go back and fill in the nitty-gritty details once sourcing images is out of the way.
Step Five: And Repeat
The reality is that digitising your wardrobe is an investment of time. If you have a collection of 30 to 100 items and you’re using the stock-photo method, you can probably blitz through the whole thing in a few hours. If your wardrobe is on the larger side, you’re looking at a project that might span several days or weeks.
The “Slow-Burn” vs. The “Sprints”
You could add items gradually as you wear them. It’s a nice way to kill two birds with one stone—tracking an outfit while logging an item—and you could even turn it into a style challenge to wear every single thing you own. The downside is this method takes much longer, and you won’t have the immediate benefit of being able to plan outfits or see your full inventory.
Personally, I think it’s better to just rip the plaster off. Commit to a few focused hours of hunting down images, uploading them, and filling in the basic data. Even with my images ready to go, it took me a solid two hours to get everything into INDYX. If you’re starting from scratch, it will take longer—but don’t let that put you off.
The initial manual labour is a one-time cost. Once it’s done, you have a powerful tool that makes getting dressed and understanding your style significantly easier. The momentum of seeing a completed category is usually enough to keep you going.
Step Six: Keep It Updated
A digital wardrobe is only as good as its last update. I know this from experience: the moment I stopped updating my spreadsheet, it became a relic. Once your digital record is out of sync with your actual wardrobe, the data becomes unreliable—and then you stop using it.
Switching to an app like INDYX has made the upkeep significantly easier because I can do it all from my phone. The second I hit ‘buy’ on Vinted, I can find the stock photo and upload it before the parcel even reached the InPost locker.
The Maintenance Loop
To stop your system from falling apart, you need a routine that keeps your data from becoming outdated. A digital wardrobe is only useful if it’s accurate.
The “One-In, One-Out” Rule: Log new arrivals immediately—ideally before the tags come off. If you declutter something, remove it from your digital wardrobe straight away. This keeps your inventory accurate.
The Monthly Audit: Set a recurring calendar alert for the last Sunday of each month. Use it as a reminder to add any new items to your inventory. It’s much easier to log three items once a month than thirty items once a year.
The Seasonal Reset: Every three months, archive or hide out-of-season items or create a seasonal capsule. This keeps your daily view focused only on what you can actually wear right now, which will help with decision fatigue.
Keeping your digital wardrobe in sync with your physical one takes about one minute per item once the initial setup is done. If you stay on top of it, you’ll never have to do a mass upload ever again.
This is very thorough and true to my experience! I would add that I don’t find taking my own photo particularly difficult, and sometimes it’s easier than digging online for a stock photo of an older item. Try both!
The other suggestion I have to make Indyx really make sense is to use it for a limited wardrobe, such as your vacation packing list. If you upload a short list of items, and build outfits in this time-limited situation, it becomes really easy to appreciate what the app can do. That will be a strong motivation to work through the rest of the process, which I agree is less difficult than it sounds like it will be!
I'm in an Indyx girly through and through! It's helped to curb my shopping so much!